
We recently had a Mid 2010 Mac Pro in the shop which had three 3TB hard drives. We did a fresh install of High Sierra on the first 3TB drive. The goal was to install Windows 7 on the second 3TB drive. The third 3TB drive was to be added to the macOS installation as a data disk.
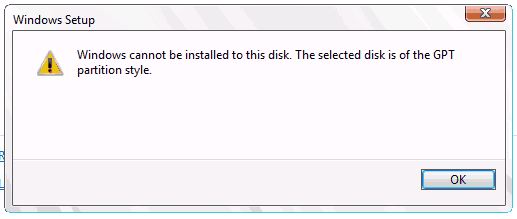
To install Windows 7 on this old Mac Pro, the drive needs to be formatted with a MBR partition scheme. If you formatted it with Apple’s Disk Utility, you might get the following error message when trying to install Windows: “Windows cannot be installed to this disk. The selected disk is of the GPT partition style”.
If you attempt to format a 3TB drive MBR using the Apple Disk Utility in High Sierra, you’ll get the error message “The disk is too large to be supported by the given partition scheme. Operation failed…”. What a pickle.
There’s no shortage of blog post hacks out there describing methods of how to install Windows 7 on old Mac Pros. Boot Camp was completely useless. It would have been much easier with a 2TB drive. Here’s what I did:
- Formatted the disk intended for Windows 7 as Mac OS extended (Journaled) with Guid Partition Map in Apple’s Disk Utility for the fun of it.
- Boot to the Windows 7 installation DVD. Note: Bootable Windows 7 USB sticks and external USB optical drives will not work on this old Mac. You need to boot the Windows 7 installer from your internal DVD drive.
- When Windows Setup asks you “Where do you want to install Windows”, press Shift F10 to get a command prompt.
- Format the drive intended for Windows MBR using the Windows command line. Be careful to select the correct disk.
diskpart

list disk

select disk n (where n is the disk you want to install Windows 7 to)

clean

convert mbr
The result is the selected drive will be erased and formatted MBR. You’ll have a 2.2TB partition which is the maximum size for MBR. The rest of the disk will be unused space. Click Refresh on the Windows installer to see your changes. You can now format that partition NTFS and select it as your Windows 7 installation destination.
But wait… after clicking Next, I immediately got the message “Windows is unable to install to the selected location. Error 0x8030024”. This is a Windows 7 installer issue. Power down the machine, disconnect any other drives attached to the system, reboot to the Windows 7 DVD again, and you’ll be able to complete the installation. When finished, re-attach the other drives, no issues.
When the Windows installation is complete, you can download the Boot Camp Windows support software manually. For more info, check the Compatibility Tables. Here’s the link applicable to this mid 2010 Mac Pro: Boot Camp Support Software 5.1.5621. For this old Mac Pro, I only needed to install the Windows Bluetooth, ATI video, Realtek sound and Intel chipset drivers.
I’m confident this Windows 7 installation could be upgraded to Windows 10 since it’s on its own disk. That’s an experiment for another day.